Getting started with the Client Extension
Learn how to configure and enable the client extension
Steps to get started with the Client Extension
The following steps must be completed prior to Building the Client Extension and Deploying A Build Version
Recommended tools for developing the Client Extension
These tools will be referenced throughout the Client Extension articles. These are not required and you may use other IDE's and Web Debugging tools.
- IDE: Microsoft Visual Studio 2019 or 2022 - Here is Microsoft's Tutorial: Visual Studio IDE Docs to get started.
- Install the .NET Core 3.1, .NET 5 or .NET 6 Runtime Component
- Debug Tool: Ngrok - Here is Ngrok's Tutorial: Getting Started
Create A GitHub Repository
Currently, GitHub is the only supported Git platform for the Client Extension.
New to GitHub?
Here is the GitHub: Quickstart Guide
Best Practice for creating and managing your repository
It is recommended that a client creates their repository from an Organization account and then adds users to the organization. This allows for better management of users that can collaborate with the repository. See Types of GitHub accounts to understand the differences between an Organization and a Personal account.
If you are using a Personal account you can always Transfer the Repository to an Organzation account
Initialize Repository From A Template
Want to get started quickly? Create your repository from our Template Repo on GitHub that has a ASP.NET 5 MVC Web Application project with the Directscale Nuget Package already referenced. Learn how by reading GitHub's Tutorial: Creating a repository from a template
It's recommended that you update the reference to the Directscale Client Library to the latest version after creating a Repository from our template. See how to Update a package with Microsoft Visual Studio
Initialize Repository Manually
Want to set up the repository yourself instead of using our template? Follow the steps below to make sure everything is set up properly for Building the Client Extension.
View the source code for the ACME Client Extension to reference as an example.
Add A Web Application Project
Add an ASP.NET Core Solution with one Web App Project to the GitHub Repository by following Microsoft's Tutorial: Get started with C# and ASP.NET Core in Visual Studio
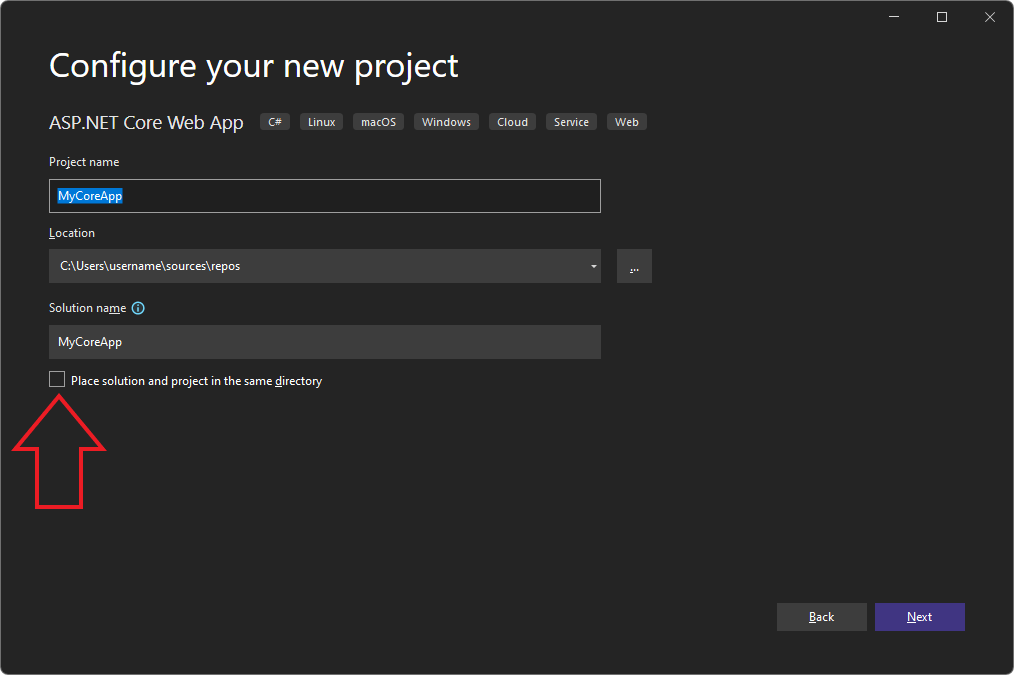
Make sure to leave the "Place solution and project in the same directory" setting shown in Figure 1 below unchecked so the project will be configured properly for Building the Client Extension

Figure 1: An image displaying a setup modal where the project is named.
Add The Directscale Client Library
Reference Getting Started with the Library to see how to add the Client Library to The Web Application project.
The following configurations must be followed for the Client Extension to build properly.
- Must use one of the following versions of .NET. (.NET Core 3.1, .NET 5, or .NET 6) and have one Web Application project in the Solution.
- The Web Application Project folder must be a top-level folder in the repository.
- The .csproj file must be located in the Web App Project Folder
- The .dll file built from the web application project must be the same name as the project
📂 ACMEClientExtension (Repository Name)
   |--- 📂 .git
   |--- 📂 ACMEClientExtension (Web Application Project)
   |        |--- ACMEClientExtension.csproj
   |        |--- 📂 bin
   |        |        |___ 📂 Release
   |        |                 |___ 📂 net5.0
   |        |                          |___ACMEClientExtension.dll
   |        |                          |___...
   |        |___...
   |--- ACMEClientExtension.sln
   |___ .gitignore
Configure the Extension Settings
API Keys
Once the GitHub Repository has been successfully created, you can begin the Client Extension configuration process by configuring the API Keys. API keys are used to secure the communication between Directscale and the Client Extension. Learn how by reading Configuring API Keys.
Invite The Directscale GitHub User
Directscale requires access to the GitHub repository to Build the Client Extension. This is done by inviting the DS-Partners GitHub User to the repository.
- Read how: GitHub: Inviting Collaborators to a Personal Repository
- If you have an organization GitHub account, then you have more control over what permissions you grant DirectScale: GitHub: Permission Levels for an Organization
The DS-Partners user needs permission to clone the repo and add Git Tags for the client extension to work properly.
Github Extension Settings
Unable to view Github Extension Settings?
Contact Customer Care for additional assistance with enabling this feature.
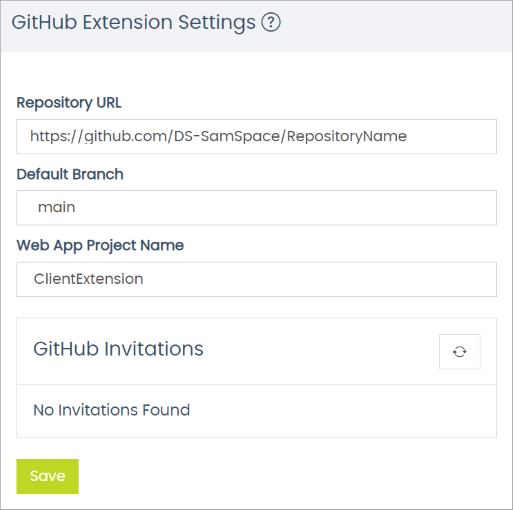
Before Building the Client Extension, you must grant DirectScale access to your GitHub Repository by completing the GitHub Extension Settings in Corporate Admin. Here, you can provide the applicable repository details and accept the GitHub invitation on behalf of DirectScale.
- Log into your Corporate Admin.
- Navigate to Tools > Developer Tools > Extension Settings.
- Complete the following fields:
- Repository URL - The URL of the GitHub Repository (ex: https://github.com/DS-Partners/AcmeClientExtension)
- Default Branch (likely "main")
- Web App Project Name
The Web App Project Name must match the name of the subfolder created within your Github Repository.
Ex: If the Client Extension template was utilized, then the Web App Project Name will be "ClientExtension"as shown in the folder structure below.📂 YourRepositoryName (Repository folder) |--- 📂 .git |--- 📂 ClientExtension (Web App Project Name) <--- **Enter the name of this subfolder** | |--- ClientExtension.csproj

Figure 2: An image displaying GitHub Extension Settings configuration.
The fields above are case-sensitive. All entries are required and must be complete. Failure to do so may cause an error when Building the Client Extension.
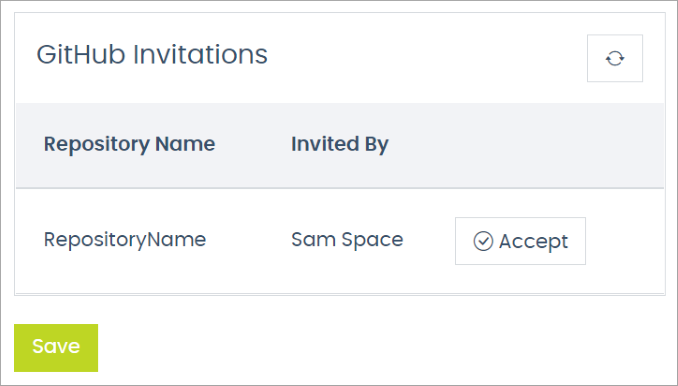
- Click the Refresh button to automatically search and locate the invitation extended to DirectScale.

Figure 3: An image displaying the DirectScale GitHub invitation.
An invitation will not display if the Repository URL is blank or incorrect.
- Click 'Accept' to accept the GitHub invitation and save the configuration settings.
Updated almost 3 years ago
