Creating an Associate with the Public API
Before You Start
Ensure you read through the Public API Getting Started guide to learn how to get authorized and locate your API Keys.
✅Read more
Locating the Endpoint
- Navigate to the API Documentation Site and Log in.
- Click the API Documentation tab.
- Click Customers.
- On the sidebar, click
POSTCreate Customer.
Defining the Call
On the POST Create Customer endpoint page, there is everything you need to make the call your own, such as:
- Sample code
- Payload information
- Response info
Click the Try It button. You navigate to the testing page, where you can build your request object.
Request Object Field Definitions
BackOfficeId- Unique identifier that Associates can see on their account. You can set theBackOfficeId, or if you don’t pass one, it will be generated by DirectScale.BirthDate- Follow this format"1973-05-12T00:00:00.0000000+00:00"CompanyName- The Associate account can include a company name.CustomerStatus- Enumeration of the Status ID. You can find an Associate status ID in the dbo.CRM_AssociateStatuses table (recordnumber column).CustomerType- Set the Associate Type. Read more about Associate Types.DefaultShippingAddress- The stored shipping address on file.Password- Enter an initial password for the Associate to log in with.InactiveDateThe date the Associate went inactive. Follow this format:"0001-01-01T00:00:00".LanguageCode- Language preference (i.e.,"en").PrimaryAddress- Main address in the system.SendEmails- True/false. Used to allow emails sent from corporate.SponsorId- Associate ID of Sponsor in the Placement Tree.TaxId- Social Security Number, Value Added Tax (VAT) number, etc.TermsAccepted- True/false. Whether the Associate accepts the Terms and Conditions.Username- Login name.WebAlias- Used to identify the Associate and is also found in their Shop URL (shop.{Client_ID}.directscale.com/{webalias}/Home)
Building the Request
Build the request body, entering valid data in the fields.
For example:
{
  "BackOfficeId": "TestBackOfficeId01",
  "BirthDate": "1973-05-12T00:00:00.0000000+00:00",
  "CompanyName": "Test Company Name Inc.",
  "CustomerStatus": 1,
  "CustomerType": 1,
  "DefaultShippingAddress": {
    "Street1": "250 South 400 West",
    "Street2": "Suite #225",
    "PostalCode": "84042",
    "City": "Lindon",
    "Region": "UT",
    "CountryCode": "US"
  },
  "EmailAddress": "[email protected]",
  "ExternalReferenceId": "EXT1234567890",
  "FirstName": "Ryan",
  "LanguageCode": "en",
  "LastName": "Testing",
  "Password": "PasswordHere1",
  "PrimaryAddress": {
    "Street1": "250 South 400 West",
    "Street2": "Suite #225",
    "PostalCode": "84042",
    "City": "Lindon",
    "Region": "UT",
    "CountryCode": "US"
  },
  "PrimaryPhone": "+1 801 555-1111",
  "SecondaryPhone": "+1 801 555-2222",
  "SendEmails": true,
  "SignUpDate": "1988-01-01T00:00:00.0000000+00:00",
  "SponsorId": 2,
  "TaxExempt": false,
  "TaxExemptId": "TAX-TEST-0000",
  "TaxId": "TAX-TEST-1111",
  "TermsAccepted": true,
  "TextPhone": "+1 801 555-1111",
  "Username": "TestUsername01",
  "WebAlias": "TestWebAlias",
  "AssociateCustom": {
    "Field1": "CustomField Content",
    "Field2": "Available through Field10"
  }
}
Unique Data Required:
BackOfficeIdEmailAddressTaxIdUsernameWebAlias
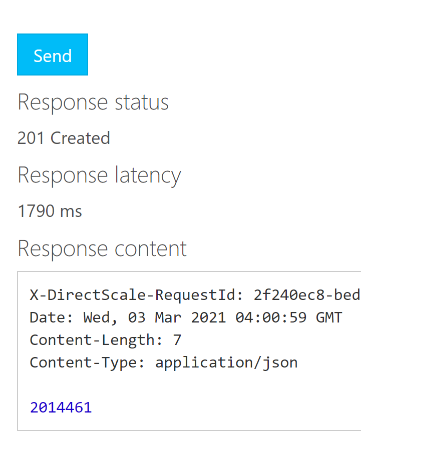
When ready, click the Send button. If successful, you'll get a 201 - Created response and a Customer ID (Associate ID).